
Using markers is a great way to get a visual representation of your voice over session even before you do any recording.
I like to think of the edit window in my recording program as a blank sheet of paper. Just like with paper, though, you can either stare at it and get intimidated by blank space or your first draft will be rough if you don’t plan.
Some people will create an outline before they start writing and this can give you a basic understanding of how things are going to go.
The edit window is kind of the same thing. Use it like a blank page and create an outline that is going to give you visual feedback for session organization. Everything about the edit window is visual. Why not make it work for you and take control of your session before it even begins?
Too many people start recording right at the beginning of the timeline and then run into all kinds of trouble later on.
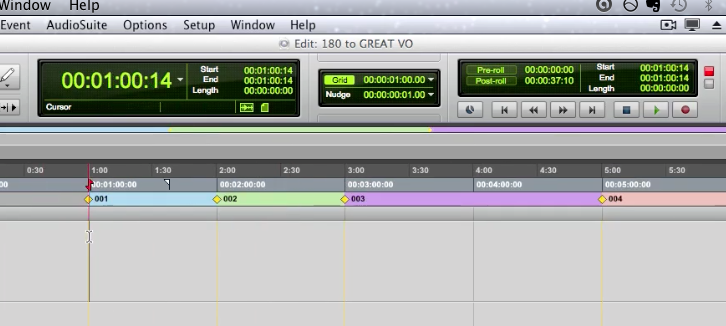
I prefer to leave at least a full minute before any audio begins in my sessions.
My Process Of Using Markers
To begin my outline, I will put a marker at the one-minute location and I will name that marker to represent the spot number or title of my first script. It is helpful to list your scripts in order if they are numbered.
So if my first spot number is 001, it will live at the first minute of the timeline. If my first script is a :30 read, the next spot will begin at the two-minute location, and so on. (It does not matter if the spots are numbered 456, 460, and 462, I will still start at one-minute and keep it sequential.)
I find it helpful to leave blank space after each commercial that is equal to its length. So :30 commercials will have :30 of space after them. If you are recording :60 commercials, leave one minute of space after it before your next spot begins.
This ensures that every script will remain on a one-minute mark on the timeline and not fall somewhere in between at an odd place.
Your recording session will be visually appealing and easy to navigate, especially if you have been away from it for some time and come back later.
When you are ready to record, start in a place that is a full commercial spot length after you have marked out your completed spots.
Using markers is a great way to set your session up for success and make it visually informative before you record anything.
Keep an eye out for the next installment of 180 To Great VO!